Appearance
geoserver
源码概述
本文基于geoserver 2.25.0版本
第一个断点——请求的集散中心
建议打在org.geoserver.ows.Dispatcher#handleRequestInternal,该函数负责服务请求的分发。如请求http://localhost:8080/geoserver/one/wfs?request=getCapabilities, 会进入该函数。
下面是对其主要逻辑的注释
java
protected ModelAndView handleRequestInternal(
            HttpServletRequest httpRequest, HttpServletResponse httpResponse) throws Exception {
    preprocessRequest(httpRequest);

    // create a new request instance.
    // 创建一个geoserver定义的请求对象,保存httpResponse和httpRequest外,还有其他业务对象属性
    Request request = new Request();

    // set request / response
    request.setHttpRequest(httpRequest);
    request.setHttpResponse(httpResponse);
    // 服务描述描述类,保存具体的服务实现类对象和其他信息
    Service service = null;

    try {
        // initialize the request and allow callbacks to override it.初始化请求对象,并调用回调函数取处理它
        request = init(request);

        // store it in the thread local
        REQUEST.set(request);

        // find the service
        try {
            service = service(request);
        } catch (Throwable t) {
            exception(t, null, request);

            return null;
        }

        // throw any outstanding errors
        if (request.getError() != null) {
            throw request.getError();
        }

        // dispatch the
        // operation.服务操作描述类,保存服务描述类org.geoserver.platform.Service对象、具体服务方法的引用(后续反射调用),方法的真实参数也会记录在operation对象中
        Operation operation = dispatch(request, service);
        request.setOperation(operation);

        if (request.isSOAP()) {
            // let the request object know that this is a SOAP request, since it effects
            // often how the request will be encoded
            flagAsSOAP(operation);
        }

        // execute it.反射调用,执行operation保存的service对象org.geoserver.platform.Service.service的相关方法
        Object result = execute(request, operation);

        // write the response.获取result后,以适当的方式写入httpResponse
        if (result != null) {
            response(result, request, operation);
        }
    } catch (Throwable t) {
        // make Spring security exceptions flow so that exception transformer filter can handle
        // them
        if (isSecurityException(t)) throw (Exception) t;
        exception(t, service, request);
    } finally {
        fireFinishedCallback(request);
        REQUEST.remove();
    }

    return null;
}
找到处理请求的服务函数
org.geoserver.ows.Dispatcher#dispatch函数要重点讲下,该函数有二个参数(Request req, Service serviceDescriptor), 第一个参数看上面的代码注释,可以理解为请求的上下文,servlet的request和response保存在里面,还有一些中间数据也保存在里面。第二个服务描述对象,保存响应本次请求的服务实现类的信息。下面是代码和注释(删除一些非主要代码)
java
Operation dispatch(Request req, Service serviceDescriptor) throws Throwable {
        ...

        // lookup the operation, initial lookup based on
        // (service,request).serviceBean为具体的服务实现类对象,如org.geoserver.wfs.DefaultWebFeatureService
        Object serviceBean = serviceDescriptor.getService();
        Method operation =
                OwsUtils.method(
                        serviceBean.getClass(),
                        req
                                .getRequest()); // 实现类根据requert参数获取到的方法引用,如org.geoserver.wfs.DefaultWebFeatureService.getFeature方法

        ...

        // step 4: setup the paramters,这里请求中的参数进行包装,就是将请求中的参数转换成为Method operation定义的参数类型
        Object[] parameters = new Object[operation.getParameterTypes().length];

        for (int i = 0; i < parameters.length; i++) {
            Class<?> parameterType = operation.getParameterTypes()[i];//获取函数的每个参数类型

            // first check for servlet request and response.如果operation参数是这两类标准的servlet请求响应对象,直接将req保存的对象传递给operation对象
            if (parameterType.isAssignableFrom(HttpServletRequest.class)) {
                parameters[i] = req.getHttpRequest();
            } else if (parameterType.isAssignableFrom(HttpServletResponse.class)) {
                parameters[i] = req.getHttpResponse();
            }
            // next check for input and output.同上
            else if (parameterType.isAssignableFrom(InputStream.class)) {
                parameters[i] = req.getHttpRequest().getInputStream();
            } else if (parameterType.isAssignableFrom(OutputStream.class)) {
                parameters[i] = req.getHttpResponse().getOutputStream();
            } else {
                // check for a request object.如果不是上述类型,那么传递给operation的参数对象实例需要在注册的bean中查找了
                Object requestBean = null;

                // track an exception
                Throwable t = null;

                // Boolean used for evaluating if the request bean has been parsed in KVP or in XML
                boolean kvpParsed = false;
                boolean xmlParsed = false;

                if (req.getKvp() != null && req.getKvp().size() > 0) {
                    // use the kvp reader mechanism
                    try {
                        requestBean = parseRequestKVP(parameterType, req); //获取服务对象内的方法传入的实际对象
                        kvpParsed = true;
                    } catch (Exception e) {
                        // don't die now, there might be a body to parse
                        t = e;
                    }
                }
                if (req.getInput() != null) {
                    // use the xml reader mechanism
                    requestBean = parseRequestXML(requestBean, req.getInput(), req);
                    xmlParsed = true;
                }

                // if no reader found for the request, throw exception
                // TODO: we may wish to make this configurable, as perhaps there
                // might be cases when the service prefers that null be passed in?
                if (requestBean == null) {
                    // unable to parse request object, throw exception if we
                    // caught one
                    if (t != null) {
                        throw t;
                    }
                    if (kvpParsed && xmlParsed || (!kvpParsed && !xmlParsed)) {
                        throw new ServiceException(
                                "Could not find request reader (either kvp or xml) for: "
                                        + parameterType.getName()
                                        + ", it might be that some request parameters are missing, "
                                        + "please check the documentation");
                    } else if (kvpParsed) {
                        throw new ServiceException(
                                "Could not parse the KVP for: " + parameterType.getName());
                    } else {
                        throw new ServiceException(
                                "Could not parse the XML for: " + parameterType.getName());
                    }
                }

                // GEOS-934  and GEOS-1288
                Method setBaseUrl =
                        OwsUtils.setter(requestBean.getClass(), "baseUrl", String.class); //获取requestBean的setBaseUrl方法
                if (setBaseUrl != null) {
                    setBaseUrl.invoke(
                            requestBean,
                            new String[] {ResponseUtils.baseURL(req.getHttpRequest())}); //如http://localhost:8080/geoserver/
                }

                // another couple of thos of those lovley cite things, version+service has to
                // specified for
                // non capabilities request, so if we dont have either thus far, check the request
                // objects to try and find one
                // TODO: should make this configurable
                if (requestBean != null) {
                    // if we dont have a version thus far, check the request object
                    if (req.getService() == null) {
                        req.setService(lookupRequestBeanProperty(requestBean, "service", false));
                    }

                    if (req.getVersion() == null) {
                        req.setVersion(
                                normalizeVersion(
                                        lookupRequestBeanProperty(requestBean, "version", false)));
                    }

                    if (req.getOutputFormat() == null) {
                        req.setOutputFormat(
                                lookupRequestBeanProperty(requestBean, "outputFormat", true));
                    }

                    parameters[i] = requestBean;
                }
            }
        }

        ...
        //构造Operation op.op里保存了服务请求、请求响应服务实现类,服务实现类响应本次操作的函数及其参数,便于后续反射调用
        Operation op = new Operation(req.getRequest(), serviceDescriptor, operation, parameters);
        return fireOperationDispatchedCallback(req, op);
    }
获取结果
获得Operation op对象后,直接反射调用获取结果
java
// execute it.反射调用,执行operation保存的service对象org.geoserver.platform.Service.service的相关方法
Object result = execute(request, operation);
谁来把结果写入Http响应中
结果是有了,类型是Object,怎么写入HttpResponse响应返回,就交给org.geoserver.ows.Dispatcher#response
java
 // write the response.获取result后,以适当的方式写入httpResponse
if (result != null) {
    response(result, request, operation);
}
org.geoserver.ows.Dispatcher#response函数主要逻辑就是根据请求信息,从注册的org.geoserver.ows.Response对象中匹配一个处理本次请求的响应处理对象来负责本次结果的写入。
扩展服务
GeoServer有一些标准的OGC服务,如WFS、WMS. 官方网站为我们提供了服务扩展包,如WPS,只需要下载扩展包,把扩展包内的jar引入到工程的类路径下即可生效。如果我们想定义一个自己的服务该怎么办。官方开发文档有个简单示例。
一个简单的官方扩展服务示例
下面描述下官方示例的主要步骤
创建一个名为hello的maven工程,pom.xml如下:
xml
<?xml version="1.0" encoding="ISO-8859-1"?>
<project xmlns="http://maven.apache.org/POM/4.0.0" xmlns:xsi="http://www.w3.org/2001/XMLSchema-instance"
xsi:schemaLocation="http://maven.apache.org/POM/4.0.0 http://maven.apache.org/maven-v4_0_0.xsd">

<modelVersion>4.0.0</modelVersion>

<!-- set parent pom to community pom -->
<parent>
    <groupId>org.geoserver</groupId>
    <artifactId>community</artifactId>
    <version>2.26-SNAPSHOT</version> <!-- change this to the proper GeoServer version -->
</parent>

<groupId>org.geoserver</groupId>
<artifactId>hello</artifactId>
<packaging>jar</packaging>
<version>1.0</version>
<name>Hello World Service Module</name>

<!-- declare dependency on geoserver main -->
<dependencies>
    <dependency>
        <groupId>org.geoserver</groupId>
        <artifactId>gs-main</artifactId>
        <version>2.26-SNAPSHOT</version> <!-- change this to the proper GeoServer version -->
    </dependency>
</dependencies>

<repositories>
    <repository>
        <id>boundless</id>
        <name>Boundless Maven Repository</name>
        <url>https://repo.boundlessgeo.com/snapshot</url>
        <snapshots>
            <enabled>true</enabled>
        </snapshots>
    </repository>
</repositories>

</project>
创建一个HelloWorld类,这个类就是我们要实现的服务响应类.原文对该类的描述:The service is relatively simple. It provides a method sayHello(..) which takes a HttpServletRequest, and a HttpServletResponse. The parameter list for this function is automatically discovered by the org.geoserver.ows.Dispatcher.
java
import java.io.IOException;
import javax.servlet.ServletException;
import javax.servlet.http.HttpServletRequest;
import javax.servlet.http.HttpServletResponse;

public class HelloWorld {

    public HelloWorld() {
        // Do nothing
    }

    public void sayHello(HttpServletRequest request, HttpServletResponse response)
            throws ServletException, IOException {
        response.getOutputStream().write("Hello World".getBytes());
    }
}
创建一个applicationContext.xml.作用是将我们自定义的HelloWord服务注册到GeoServer
xml
<?xml version="1.0" encoding="UTF-8"?>
<!DOCTYPE beans PUBLIC "-//SPRING//DTD BEAN//EN" "http://www.springframework.org/dtd/spring-beans.dtd">
<beans>
    <!-- Spring will reference the instance of the HelloWorld class
            by the id name "helloService" -->
    <bean id="helloService" class="HelloWorld"/>
    <!-- This creates a Service descriptor, which allows the org.geoserver.ows.Dispatcher
        to locate it. -->
    <bean id="helloService-1.0.0" class="org.geoserver.platform.Service">
        <!-- used to reference the service in the URL -->
        <constructor-arg index="0" value="hello"/>
        <!-- our actual service POJO defined previously -->
        <constructor-arg index="1" ref="helloService"/>
        <!-- a version number for this service -->
        <constructor-arg index="2" value="1.0.0"/>
        <!-- a list of functions for this service -->
        <constructor-arg index="3">
            <list>
                <value>sayHello</value>
            </list>
        </constructor-arg>
    </bean>
</beans>
mvn install 后,本地仓库应该有hello-1.0.jar web-app/pom.xml引入依赖
xml
 <dependency>
    <groupId>org.geoserver</groupId>
    <artifactId>hello</artifactId>
    <version>1.0-SNAPSHOT</version>
</dependency>重启GeoServer后,访问http://[host]/geoserver/ows?request=sayHello&service=hello&version=1.0.0,页面显示Hello World表示成功,我们自定义的服务注册成功。
服务的配置页
上面的官方示例是简单的,但我们看WFS的实现,还是有点复杂的,WFS还有服务配置页。如果我们想实现类似WFS的服务,不妨叫MYS, 如下图的效果
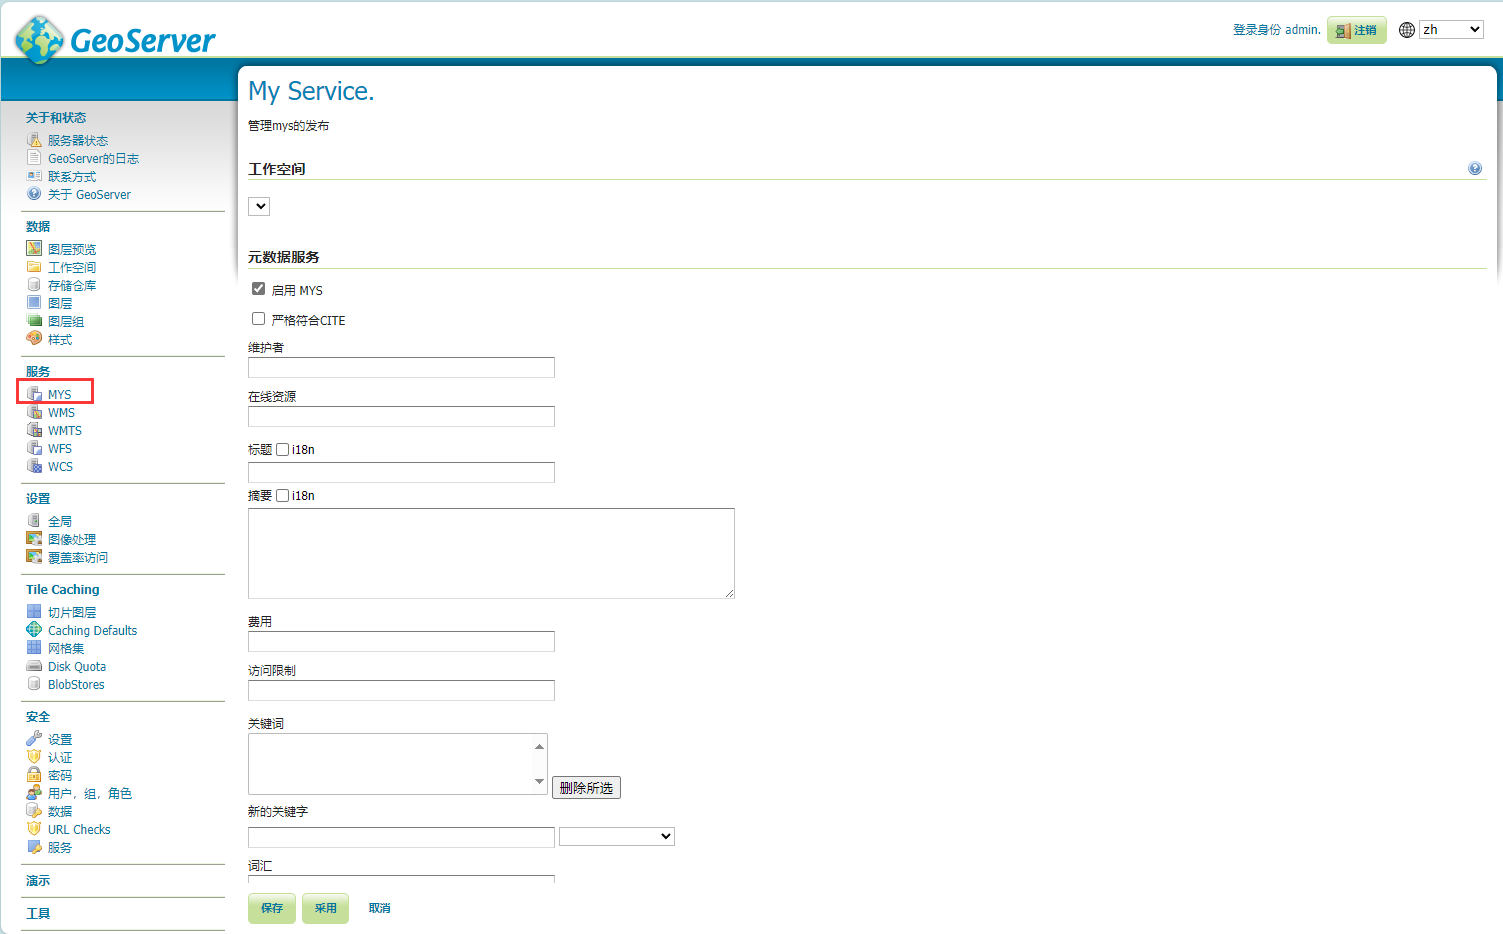
可以仿照WFS服务的实现。假设我们有个mys服务,像官方示例一样有个sayHello接口
新建一个mys工程
新建一个applicationContext.xml
xml
<?xml version="1.0" encoding="UTF-8"?>
<!--
 Copyright (C) 2014 - 2016 Open Source Geospatial Foundation. All rights reserved.
 This code is licensed under the GPL 2.0 license, available at the root
 application directory.
 -->
<!DOCTYPE beans PUBLIC "-//SPRING//DTD BEAN//EN" "http://www.springframework.org/dtd/spring-beans.dtd">

<beans>
	<!-- Spring will reference the instance of the HelloWorld class
            by the id name "helloService" -->
	<bean id="mysService" class="com.walle.mys.MyService10Impl">
		<constructor-arg ref="geoServer"/>
	</bean>

	<!-- This creates a Service descriptor, which allows the org.geoserver.ows.Dispatcher
        to locate it. -->
	<bean id="mysService-1.0.0" class="org.geoserver.platform.Service">

		<!-- used to reference the service in the URL -->
		<constructor-arg index="0" value="mys"/>

		<!-- our actual service POJO defined previously -->
		<constructor-arg index="1" ref="mysService"/>

		<!-- a version number for this service -->
		<constructor-arg index="2" value="1.0.0"/>

		<!-- a list of functions for this service -->
		<constructor-arg index="3">
			<list>
				<value>sayHello</value>
			</list>
		</constructor-arg>

	</bean>

	<bean id="mysFactoryExtension" class="com.walle.mys.MYSFactoryExtension"/>

	<!--服务管理页注册-->
	<bean id="mysServicePage" class="org.geoserver.web.services.ServiceMenuPageInfo">
		<property name="id" value="mys"/>
		<property name="titleKey" value="mys.title"/>
		<property name="descriptionKey" value="mys.description"/>
		<property name="componentClass" value="com.walle.mys.web.MYSAdminPage"/>
		<property name="icon" value="server_vector.png"/>
		<property name="category" ref="servicesCategory"/>
		<property name="serviceClass" value="com.walle.mys.MYSInfo"/>
	</bean>

	<bean id="mysLegacyLoader" class="com.walle.mys.MYSLoader"/>
	<bean id="mysLoader" class="com.walle.mys.MYSXStreamLoader">
		<constructor-arg ref="resourceLoader"/>
	</bean>
</beans>
xml中有很多自实现的类,这些类都可以仿照WFS/WMS这些现有的服务实现代码。如com.walle.mys.MYSInfo是MYS服务的配置类,服务配置页的保存就是持久化该对象,可以直接参考WFSInfo的实现。
扩展数据源
官方网站提供了数据源扩展插件,如MySql、Oracle都需要下载官方插件包,把插件包引入到类路径下,添加存储仓库才会有添加这些数据库的选项。那如果官方的这些插件都不满足需求,如官方没有geojson数据源扩展插件,该如何实现。
数据源的扩展机制
可以在org.geoserver.web.data.store.NewDataPage#getAvailableDataStores打个断点,“存储仓库-->添加新的存储仓库”就会到该断点。下面是该函数返回的对象结果调试结果图。
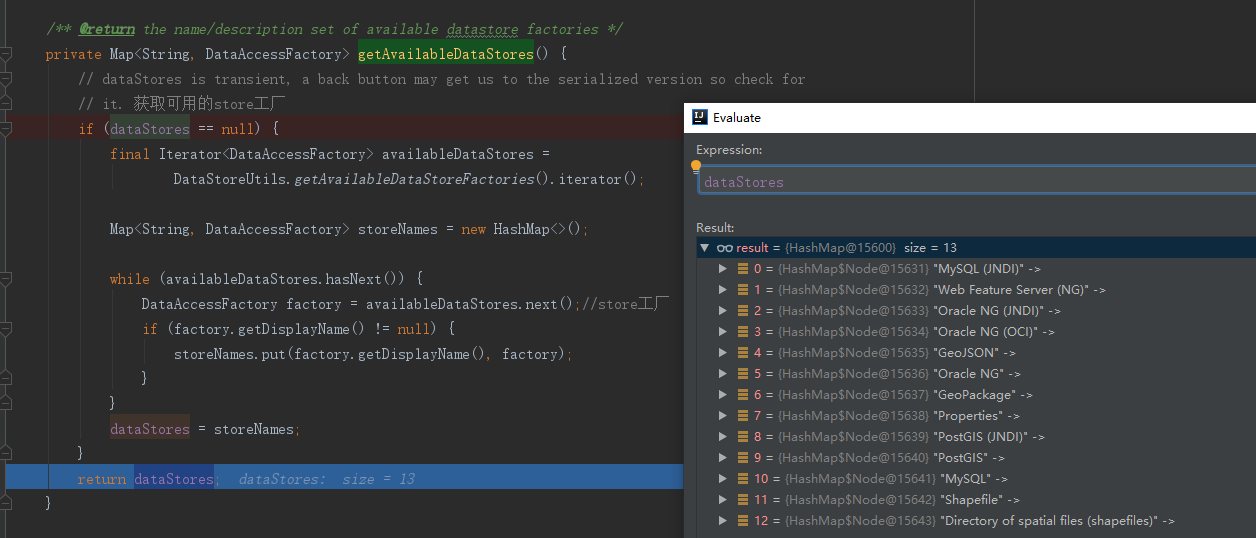
getAvailableDataStores是获取矢量数据源,如上图是13个,我们看下页面
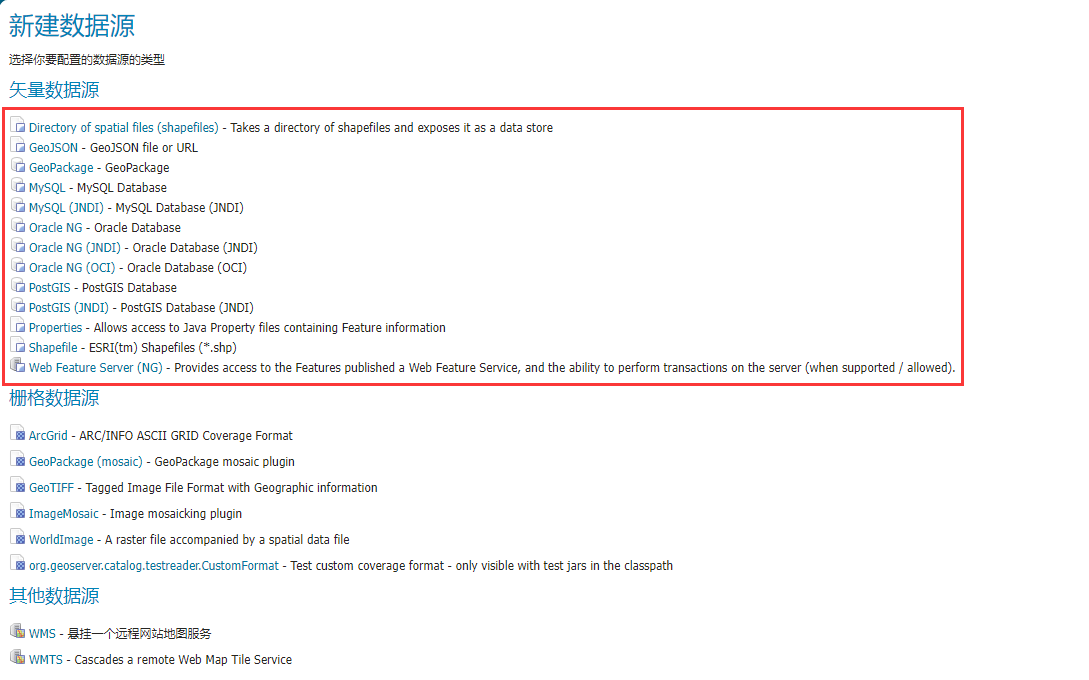
矢量数据源也是13个,你会发现我的这个geoserver添加新的数据源的矢量数据源选项,肯定比你刚下载的geoserver的矢量数据源要多,因为从官方下载了MySQL、Oracle的数据源扩展插件。其中上面还有一个GeoJSON数据源,官方插件没有。这该如何实现?
GeoServer在数据源这块依赖GeoTools,DataStore接口的扩展机制只要看GeoTools的实现。看看geotools mysql数据源的包
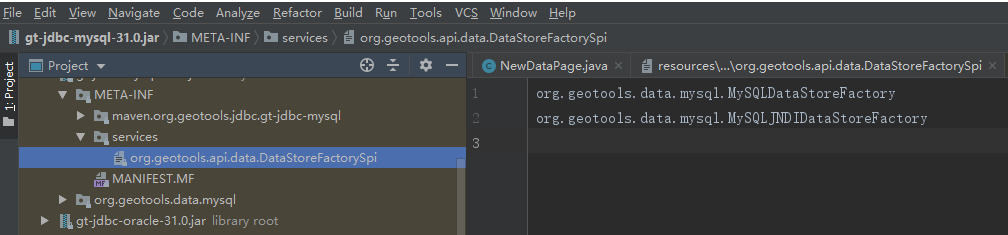
问题就比较清楚了,各种数据源工厂实现相应的 DataStoreFactorySpi接口,并在jar包的META-INF/services里以接口命名文件,文件内写实现类,实现类就会被注册。
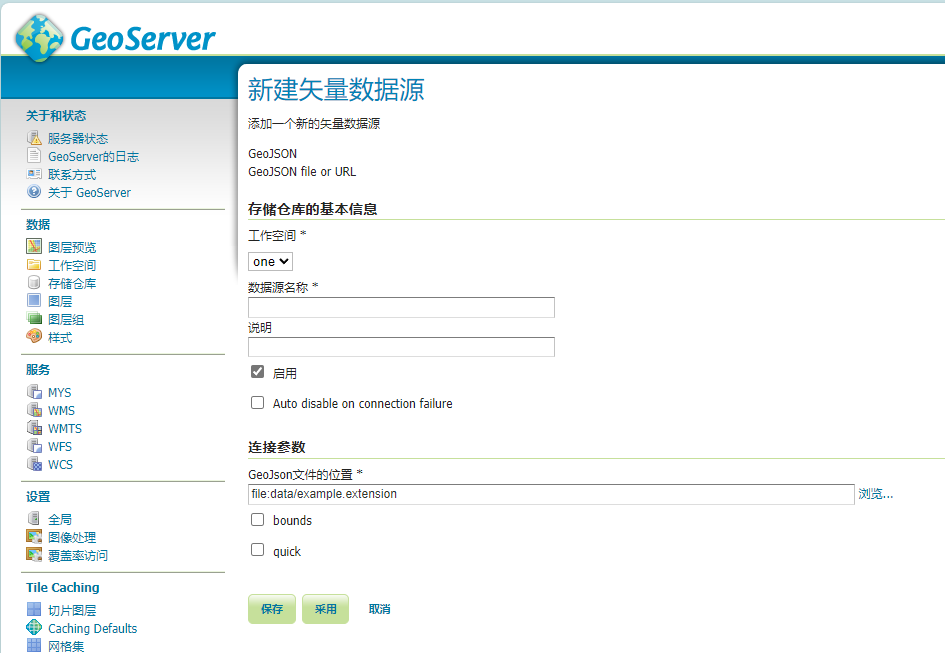
GeoTools是有geojson的数据源实现的,我们可以把这个数据源的jar包引入到GeoServer的类路径下即可。还没完,添加GeoJSON存储仓库的选项是有了,点击后显示的构造数据源的页面没有(在没有自定义页面的情况下,有一个默认的页面,相当于没有,因为没啥用)。因为每个数据源工厂实现类创建数据源都有自己需要的参数,如何在界面配置传递给数据源工厂?
添加数据源的配置页
先看下org.geotools.data.geojson.store.GeoJSONDataStoreFactory的部分源码,主要是创建DataStore那块。
java
/** Parameter description of information required to connect */
public static final Param FILE_PARAM =
        new Param(
                "file", File.class, "GeoJSON file", false, null, new KVP(Param.EXT, "geojson"));

public static final Param URL_PARAM =
        new Param("url", URL.class, "GeoJSON URL", false, null, new KVP(Param.EXT, "geojson"));
public static final Param BOUNDING_BOX =
        new Param(
                "bbox",
                ReferencedEnvelope.class,
                "A bounding box for the features to be written",
                false);
public static final Param WRITE_BOUNDS =
        new Param(
                "bounds",
                Boolean.class,
                "Should a bounding box be written out if available",
                false);
public static final Param QUICK_SCHEMA =
        new Param(
                "quick",
                Boolean.class,
                "Should the schema be described by the first element of the collection (Default true)",
                false);

@Override
public DataStore createNewDataStore(Map<String, ?> params) throws IOException {
    URL url = (URL) URL_PARAM.lookUp(params);
    File file = (File) FILE_PARAM.lookUp(params);
    if (url == null && file == null) {
        throw new IOException("No file or url parameter provided");
    }
    if (url != null && "file".equalsIgnoreCase(url.getProtocol())) {
        file = URLs.urlToFile(url);
    }
    GeoJSONDataStore ret;
    if (file != null) {
        if (!file.exists()) {
            boolean ok = file.createNewFile();
            if (!ok) {
                throw new IOException("Unable to create file " + file.getAbsoluteFile());
            }
        }
        ret = new GeoJSONDataStore(file);
    } else {
        ret = new GeoJSONDataStore(url);
    }

    Boolean bounds = (Boolean) WRITE_BOUNDS.lookUp(params);
    if (bounds != null) {
        ret.setWriteBounds(bounds);
    }
    ReferencedEnvelope bbox = (ReferencedEnvelope) BOUNDING_BOX.lookUp(params);
    if (bbox != null) {
        ret.setBbox(bbox);
    }
    Boolean quick = (Boolean) QUICK_SCHEMA.lookUp(params);
    if (quick != null) {
        ret.setQuickSchema(quick);
    }
    return ret;
}
可以看到构造GeoJSONDataStore用到了file或url,这两个必须, 用set方法设置bounds,bbox,quick,这三个可选。如果我们想要创建特定的对象,将这些参数传递给工厂就行,为了便于实现(边框的界面前端实现不太容易,先忽略这个可选参数),暂时选取url、bounds、quick作为需要传递工厂参数,我们在添加数据源界面提供这3个参数的可填项。
新建一个工程,创建GeojsonFileDataStoreEditPanel类,参照其他数据源页面配置类实现。
java
public class GeojsonFileDataStoreEditPanel extends StoreEditPanel {

    public GeojsonFileDataStoreEditPanel(final String componentId, final Form storeEditForm) {
        super(componentId, storeEditForm);

        final IModel model = storeEditForm.getModel();
        setDefaultModel(model);

        final IModel<Map<String, Object>> paramsModel =
                new PropertyModel<>(model, "connectionParameters");

        Panel file = buildFileParamPanel(paramsModel);
        add(file);


        add(
                new CheckBoxParamPanel(
                        "bounds",
                        new MapModel<>(paramsModel, WRITE_BOUNDS.key),
                        new ParamResourceModel("bounds", this)));

        add(
                new CheckBoxParamPanel(
                        "quick",
                        new MapModel<>(paramsModel, QUICK_SCHEMA.key),
                        new ParamResourceModel("quick", this)));
    }

    protected Panel buildFileParamPanel(final IModel<Map<String, Object>> paramsModel) {
        FileParamPanel file =
                new FileParamPanel(
                        URL_PARAM.key,
                        new MapModel<>(paramsModel, URL_PARAM.key),
                        new ParamResourceModel("url", this),
                        true);
        file.setFileFilter(new Model<>(new ExtensionFileFilter(".geojson")));
        file.getFormComponent().add(new FileExistsValidator());
        return file;
    }
}
同级目录新建一个同名的html,GeojsonFileDataStoreEditPanel.html
html
<html xmlns:wicket="http://wicket.apache.org/">
<body>
<wicket:panel>
	<fieldset>
	  <legend><span><wicket:message key="connectionParameters">Connection Parameters</wicket:message></span></legend>
	  <!--<div wicket:id="file"></div>-->
	  <div wicket:id="url"></div>
	  <!--<div wicket:id="bbox"></div>-->
		<!--<div id="bbox" wicket:id="bbox"></div>-->
	  <div wicket:id="bounds"></div>
	  <div wicket:id="quick"></div>
		<wicket:child></wicket:child>
	</fieldset>
</wicket:panel>
</body>
</html>
新建applicationContext.xml,注册页面
xml
<?xml version="1.0" encoding="UTF-8"?>
<!--
 Copyright (C) 2014 - 2016 Open Source Geospatial Foundation. All rights reserved.
 This code is licensed under the GPL 2.0 license, available at the root
 application directory.
 -->
<!DOCTYPE beans PUBLIC "-//SPRING//DTD BEAN//EN" "http://www.springframework.org/dtd/spring-beans.dtd">

<beans>

  <bean id="geojsonFileDataStoreEditPanel" class="org.geoserver.web.data.resource.DataStorePanelInfo">
    <property name="id" value="geojsonfile" />
    <property name="factoryClass"
      value="org.geotools.data.geojson.store.GeoJSONDataStoreFactory" />
    <property name="iconBase" value="org.geoserver.web.GeoServerApplication" />
    <property name="icon" value="img/icons/geosilk/page_white_vector.png" />
    <property name="componentClass"
      value="com.wallezhou.gsplugin.geojson.GeojsonFileDataStoreEditPanel" />
  </bean>

</beans>
这样,自定义页面实现完成。打包jar与gt-geojson-store.jar一起放到GeoServer的类路径下,就可以支持GeoJSON存储仓库的添加了。
看看界面效果