Appearance
maven
Maven生命周期
maven有三个生命周期:clean、default、site
每个周期有若干阶段。Maven 默认为一些核心的生命周期阶段绑定了插件目标,当用户调用这些阶段时,对应的插件目标就会自动执行相应的任务。其中maven-resources-plugin的resources和testResources两个目标,绑定到了default生命周期的process-resources和process-test-resources两个阶段上。
Maven是一个项目管理工具,它把项目的构建主要分为了以下阶段:
validate:验证项目是否正确,所有必要的信息是否均已经提供 compile:编译项目的源代码。 test:运行单元测试。 package:打包已编译的代码。 verify:对集成测试结果进行检查,确保符合质量标准。 install:将软件包安装到本地仓库。 deploy:将最终的软件包复制到远程仓库,方便和其他开发人员共享。 也就是说,只要是一个Maven项目,从源代码到一个可运行的程序,需要经历着一系列的构建阶段。而每个阶段的背后,是Maven提供了一个构建过程的核心执行引擎,这个核心的项目构建执行引擎是由大量的插件来执行具体的任务。
| 阶段 | 插件目标 | 执行的任务 |
|---|---|---|
| pre-clean | ||
| clean | maven-clean-plugin:clean | 清理maven的输出目录 |
| post-clean | ||
| validate | 验证项目是否正确 | |
| initialize | 初始化构建状态 | |
| generate-sources | 生成源代码 | |
| process-sources | 处理源代码 | |
| generate-resources | 生成资源文件 | |
| process-resources | maven-resources-plugin:resources | 复制资源文件到输出目录 |
| compile | maven-compiler-plugin:compile | 编译代码到输出目录 |
| generate-test-sources | 生成测试源代码 | |
| process-test-sources | 处理测试源代码 | |
| generate-test-resources | 生成测试资源文件 | |
| process-test-resources | maven-resources-plugin:testResources | 复制测试资源文件到测试输出目录 |
| test-compile | maven-compiler-plugin:testCompile | 编译测试代码到测试输出目录 |
| test | maven-surefire-plugin:test | 执行测试用例 |
| prepare-package | 打包前的准备工作 | |
| package | maven-jar-plugin:jar/war | 创建jar/war包 |
| pre-integration-test | 集成测试前的准备 | |
| integration-test | maven-failsafe-plugin:integration-test | 执行集成测试 |
| post-integration-test | 集成测试后的清理 | |
| verify | maven-failsafe-plugin:verify | 验证包的有效性 |
| install | maven-install-plugin:install | 将项目输出的包文件安装到本地仓库 |
| deploy | maven-deploy-plugin:deploy | 将项目输出的包文件部署到远程仓库 |
| pre-site | ||
| site | maven-site-plugin:site | 生成项目站点 |
| post-site | ||
| site-deploy | maven-site-plugin:deploy | 将站点部署到服务器 |
maven-resources-plugin
作用:他的作用是将项目的资源(resources目录下)目录的文件复制到输出目录(target),输出目录又分为了两个,一个是测试的输出目录,一个是主资源的。所以对应了process-resources和process-test-resources两个阶段上,当然一般测试目录并没有资源目录。
插件常用配置
字符集 第一种:使用properties标签声明project.build.sourceEncoding,声明好后,插件当中的 encoding 标签会取这个编码
xml
<project ...>
 ...
 <properties>
   <project.build.sourceEncoding>UTF-8</project.build.sourceEncoding>
   ...
 </properties>
 ..
</project>
第二种通过插件配置:
xml
<project>
  ...
  <build>
    <plugins>
      <plugin>
        <groupId>org.apache.maven.plugins</groupId>
        <artifactId>maven-resources-plugin</artifactId>
        <version>3.3.1</version>
        <configuration>
          ...
          <encoding>UTF-8</encoding>
          ...
        </configuration>
      </plugin>
    </plugins>
    ...
  </build>
  ...
</project>
resources相关的配置 resources标签其实就是maven-resources-plugin的配置,主要用来配置资源目录的(注意:这么说也不准确,两个配置一样行为不一定一样,如:项目继承spring-boot-parent,由于该pom是配置resources,因此配置resources有重写的作用,在maven-resources-plugin配置行为会不一样)
xml
<build>
	<resources>
		<resource>
			<directory>${project.basedir}/src/main/resources</directory>
			<filtering/>
			<includes>
				<include/>
			</includes>
			<excludes>
				<exclude/>
			</excludes>
		</resource>
		<!--假如资源目录有多个可以在这里声明-->
		<resource>
	    ...
	  </resource>
	</resources>
</build>
标签 directory 指定资源文件目录 标签 includes 指定资源文件目录中,仅包含哪些文件被打包 标签 excludes 指定资源文件目录中,仅哪些文件不被打包 标签 filtering 是一个bool值,默认值为false。指定打包时的配置文件中是否进行变量替换
fitering参数要重点说明下,filtering默认为false,作用是是否允许指定任意文件可以以${...} or @...@的语法来提取pom.xml当中的配置。二进制文件不要过滤,没有占位符的文本文件不需要过滤
maven项目默认继承了一个父pom.xml,配置主要包含了如下,其中一些配置就是对maven-resources-plugin插件的配置
xml
<build>
	<directory>${project.basedir}/target</directory>
	<!-- 主资源默认输出的位置 -->
	<outputDirectory>${project.build.directory}/classes</outputDirectory>
	<!--打出来的默认jar、war包名-->
	<finalName>${project.artifactId}-${project.version}</finalName>
	<!-- 测试资源默认输出的位置 -->
	<testOutputDirectory>${project.build.directory}/test-classes</testOutputDirectory>
	<!--默认的主源代码地址-->
	<sourceDirectory>${project.basedir}/src/main/java</sourceDirectory>
	<scriptSourceDirectory>${project.basedir}/src/main/scripts</scriptSourceDirectory>
	<!--默认的测试源代码地址-->
	<testSourceDirectory>${project.basedir}/src/test/java</testSourceDirectory>
	<!--默认的主源代码当中的资源文件地址-->
	<resources>
		<resource>
			<directory>${project.basedir}/src/main/resources</directory>
		</resource>
	</resources>
	<!--默认的测试源代码当中的资源文件地址-->
	<testResources>
		<testResource>
			<directory>${project.basedir}/src/test/resources</directory>
		</testResource>
	</testResources>
</build>
该插件不支持文件重命名,如有需要可以maven-antrun-plugin
maven-antrun-plugin
xml
<plugin>
    <artifactId>maven-antrun-plugin</artifactId>
    <executions>
        <execution>
            <phase>process-resources</phase>
            <goals>
                <goal>run</goal>
            </goals>
            <configuration>
                <target>
                    <move file="${project.build.directory}/classes/config/config-prod.xml"
                            tofile="${project.build.directory}/classes/config/config.xml" />
                </target>
            </configuration>
        </execution>
    </executions>
</plugin>
maven-jar-plugin
不管 pom.xml 是否声明了 Maven 的默认打包插件 maven-jar-plugin,也不管是否声明了其他打包插件,maven-jar-plugin 都会在 package 阶段最先执行
xml
<plugin>
    <groupId>org.apache.maven.plugins</groupId>
    <artifactId>maven-jar-plugin</artifactId>
    <version>2.6</version>
    <configuration>
        <archive>
            <manifest>
                <addClasspath>true</addClasspath>
                <classpathPrefix>lib</classpathPrefix>
                <mainClass>cn.com.geostar.stkt.Main</mainClass>
            </manifest>
<!--                        添加manifestEntries包含system依赖,不然Classpath会缺失-->
            <manifestEntries>
                <Class-Path>lib/gskernel-1.0-SNAPSHOT.jar</Class-Path>
            </manifestEntries>
        </archive>
    </configuration>
</plugin>
前面,我们看到了是在执行package阶段时自动执行的。并且指定了运行的主类是ExampleDriver。通过查看打包后的JAR文件,我们可以发现,JAR插件只会将项目中的class文件打包到JAR文件中,并不会打包其他的依赖。
JAR包中的META-INF目录 在每个jar包中有一个META-INF目录,顾名思义。它肯定是包含了JAR文件的元数据相关。Java基于META-INF目录中的文件来配置Java应用程序、类加载器以及其他服务。它包含以下内容:
MANIFEST.MF 用于定义扩展名以及打包相关的清单。
Manifest-Version: 1.0 Archiver-Version: Plexus Archiver Built-By: China Created-By: Apache Maven 3.5.0 Build-Jdk: 1.8.0_241 Main-Class: cn.monkey.StreamingJob 该文件中显示了文件的版本、由哪个用户构建的、由哪个应用创建的、构建的JDK版本、以及非常重要的Main-Class。
INDEX.LIST 该文件由JAR工具的-i选项生成,包括了应用程序或者扩展中定义的包的位置。用于类加载器加速类加载过程。
xxx.SF JAR包的签名文件
xxx.DSA 与SF文件关联的签名块文件。该文件存储了签名文件对应的数字签名。
maven-dependency-plugin
maven-dependency-plugin插件时一个依赖管理插件,大部分情况下我们使用它都是和maven-jar-plugin配合来使用,将项目的执行jar和依赖的jar进行分离处理,这样可以减少项目执行jar的大小。
xml
<plugin>
    <groupId>org.apache.maven.plugins</groupId>
    <artifactId>maven-dependency-plugin</artifactId>
    <version>3.1.1</version>
    <executions>
        <execution>
            <id>copy-dependencies</id>
            <phase>package</phase>
            <goals>
                <goal>copy-dependencies</goal>
            </goals>
            <configuration>
                <outputDirectory>
                    ${project.build.directory}/lib
                </outputDirectory>
                <excludeTransitive>false</excludeTransitive>
<!--                            <excludeScope>test</excludeScope>-->
                <includeScope>compile</includeScope>
            </configuration>
        </execution>
        <execution>
            <id>copy-dependencies2</id>
            <phase>package</phase>
            <goals>
                <goal>copy-dependencies</goal>
            </goals>
            <configuration>
                <outputDirectory>
                    ${project.build.directory}/lib
                </outputDirectory>
                <excludeTransitive>true</excludeTransitive>
                <!--                            <excludeScope>test</excludeScope>-->
                <includeScope>system</includeScope>
            </configuration>
        </execution>
    </executions>
</plugin>
maven-source-plugin
打包源码的插件
xml
<plugin>
    <groupId>org.apache.maven.plugins</groupId>
    <artifactId>maven-source-plugin</artifactId>
    <version>2.2.1</version>
    <executions>
        <execution>
            <phase>package</phase>
            <goals>
                <goal>jar-no-fork</goal>
            </goals>
        </execution>
    </executions>
</plugin>
maven-shade-plugin
使用shade插件进行fat jar打包的。可以通过mainClass参数配置jar包的入口。Shade插件可以将打包所有的artifact到一个uber-jar(uber-jar表示在一个JAR文件中包含自身、以及所有的依赖)。Shade插件只有一个goal:shade:shade。
xml
<plugin>
    <groupId>org.apache.maven.plugins</groupId>
    <artifactId>maven-shade-plugin</artifactId>
    <version>3.1.1</version>
    <executions>
        <!-- Run shade goal on package phase -->
        <execution>
            <phase>package</phase>
            <goals>
                <goal>shade</goal>
            </goals>
            <configuration>
                <artifactSet>
                    <excludes>
                        <exclude>org.apache.flink:force-shading</exclude>
                        <exclude>com.google.code.findbugs:jsr305</exclude>
                        <exclude>org.slf4j:*</exclude>
                        <exclude>org.apache.logging.log4j:*</exclude>
                    </excludes>
                </artifactSet>
                <filters>
                    <filter>
                        <!-- Do not copy the signatures in the META-INF folder.
         Otherwise, this might cause SecurityExceptions when using the JAR. -->
                        <artifact>*:*</artifact>
                        <excludes>
                            <exclude>META-INF/*.SF</exclude>
                            <exclude>META-INF/*.DSA</exclude>
                            <exclude>META-INF/*.RSA</exclude>
                        </excludes>
                    </filter>
                </filters>
                <transformers>
                    <transformer implementation="org.apache.maven.plugins.shade.resource.ManifestResourceTransformer">
                        <mainClass>cn.monkey.StreamingJob</mainClass>
                    </transformer>
                </transformers>
            </configuration>
        </execution>
    </executions>
</plugin>
maven-assembly-plugin
很多时候我们需要把项目打包成一个tar.gz包,就像Apache的一些组件一样。通过使用Assembly插件可以将程序、文档、配置文件等等打包成一个“assemblies”。使用一个assembly descriptor可以描述整个过程。使用该插件,可以把应用打包成以下类型:
zip
tar
tar.gz (or tgz)
tar.bz2 (or tbz2)
tar.snappy
tar.xz (or txz)
jar
dir
war
而如果要打包成uber-jar,assembly插件提供了一些基本的支持。官方建议还是使用shade插件。Assembly插件的使用步骤如下:
1.选择或编写一个assembly descriptor 2.在pom.xml文件中配置assembly插件 3.运行mvn assembly:single
针对Assembly,需要有一个Assembly Descriptor(程序集描述符),通过assembly descripor文件可以描述将哪些文件复制到bin目录,并且可以修改目录中文件的权限。
xml
<plugin>
<groupId>org.apache.maven.plugins</groupId>
<artifactId>maven-assembly-plugin</artifactId>
<version>3.0.0</version>
<executions>
<execution>
<id>release</id>
<!-- 绑定到package生命周期 -->
<phase>package</phase>
<goals>
<goal>single</goal>
</goals>
</execution>
</executions>
<configuration>
<!--<archive>-->
<!--<manifest>-->
<!--<!–程序入口–>-->
<!--<mainClass>com.wallezhou.test.Main</mainClass>-->
<!--</manifest>-->
<!--<manifestEntries>-->
<!--<Class-Path>lib/*.jar</Class-Path>-->
<!--</manifestEntries>-->
<!--</archive>-->
<!--<descriptorRefs>-->
<!--<!–文件名后缀–>-->
<!--<descriptorRef>jar-with-dependencies</descriptorRef>-->
<!--</descriptorRefs>-->
<descriptors>
<!--assembly配置文件路径,注意需要在项目中新建文件assembly/win_release.xml-->
<descriptor>assembly/linux_release.xml</descriptor>
</descriptors>
</configuration>
</plugin>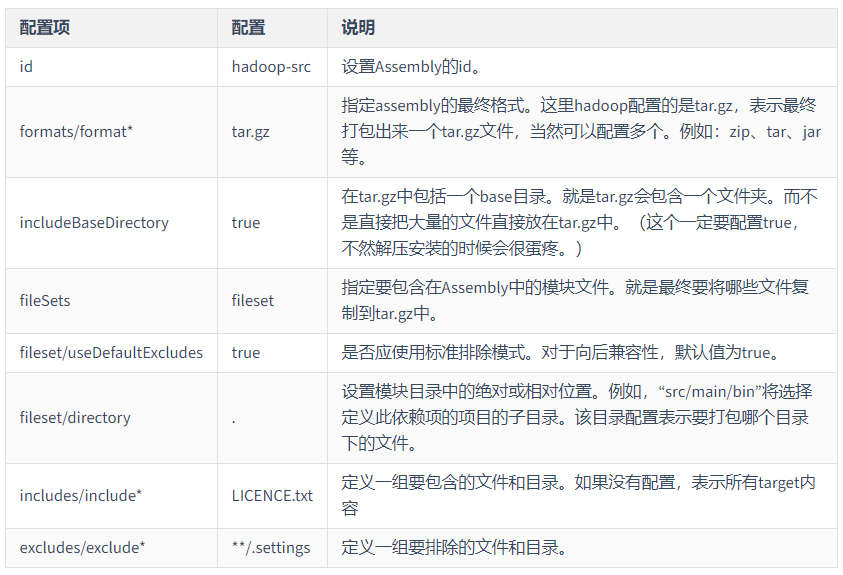
assembly/linux_release.xml的示例
xml
<assembly xmlns="http://maven.apache.org/plugins/maven-assembly-plugin/assembly/1.1.0"
          xmlns:xsi="http://www.w3.org/2001/XMLSchema-instance"
          xsi:schemaLocation="http://maven.apache.org/plugins/maven-assembly-plugin/assembly/1.1.0 http://maven.apache.org/xsd/assembly-1.1.0.xsd">
    <id>linux-release</id>
    <formats>
        <format>tar.gz</format>
    </formats>
    <!-- 压缩包中是否包含根文件夹,该根文件夹名称和去掉id后缀一致 -->
    <includeBaseDirectory>true</includeBaseDirectory>

    <fileSets>
        <fileSet>
            <directory>src/main/bin</directory>
            <includes>
                <include>*.sh</include>
            </includes>
            <outputDirectory>bin</outputDirectory>
            <fileMode>0755</fileMode>
        </fileSet>
        <fileSet>
            <directory>src/main</directory>
            <includes>
                <include>*.md</include>
            </includes>
            <outputDirectory>.</outputDirectory>
            <fileMode>0644</fileMode>
        </fileSet>
        <fileSet>
            <directory>target/classes/config</directory>
            <includes>
                <include>*.properties</include>
                <include>*.xml</include>
                <include>*.txt</include>
            </includes>
            <outputDirectory>conf</outputDirectory>
            <fileMode>0644</fileMode>
        </fileSet>
    </fileSets>

    <files>
        <file>
            <source>target/${project.artifactId}-${project.version}.jar</source>
            <outputDirectory>lib</outputDirectory>
        </file>
    </files>

    <dependencySets>
        <dependencySet>
            <useProjectArtifact>true</useProjectArtifact>
            <unpack>false</unpack>
            <scope>runtime</scope>
            <outputDirectory>lib</outputDirectory>
        </dependencySet>
        <dependencySet>
            <useProjectArtifact>true</useProjectArtifact>
            <unpack>false</unpack>
            <scope>system</scope>
            <outputDirectory>lib</outputDirectory>
        </dependencySet>
    </dependencySets>
</assembly>
dependencySet如果没有includes标签指定,默认是全部依赖,如果只想将部分jar包打进包中,添加includes指定
xml
 <includes>
    <include>org.geotools:gt-geojson-store</include>
    <!-- 更多 <include> 标签为其他依赖项 <include>groupId:artifactId</include> -->
</includes>
spring-boot-plugin
Spring Boot Maven Plugin 打包的默认方式是一个可执行的“uber”(fat)jar,它包括了应用程序的所有依赖,将所有的类文件打包进一个单一的、可执行的jar中。
spring-boot-plugin打包war
在Spring Boot项目中,如果你想要打包成WAR文件而不是JAR文件,你需要做一些额外的配置。以下是步骤和示例代码:
修改pom.xml文件,确保你的<packaging>是war。
xml
<packaging>war</packaging>添加Spring Boot的WAR支持依赖。
xml
<dependency>
    <groupId>org.springframework.boot</groupId>
    <artifactId>spring-boot-starter-web</artifactId>
</dependency>

<dependency>
    <groupId>org.springframework.boot</groupId>
    <artifactId>spring-boot-starter-tomcat</artifactId>
    <scope>provided</scope>
</dependency>
在你的Application类中,继承SpringBootServletInitializer并重写configure方法。
java
import org.springframework.boot.SpringApplication;
import org.springframework.boot.autoconfigure.SpringBootApplication;
import org.springframework.boot.builder.SpringApplicationBuilder;
import org.springframework.boot.web.servlet.support.SpringBootServletInitializer;

@SpringBootApplication
public class Application extends SpringBootServletInitializer {

    @Override
    protected SpringApplicationBuilder configure(SpringApplicationBuilder application) {
        return application.sources(Application.class);
    }

    public static void main(String[] args) {
        SpringApplication.run(Application.class, args);
    }
}
springboot项目不打包为fat.jar的打包配置
spring-boot-maven-plugin默认打包为fat.jar,如果想要将lib与当前工程class分离,可以参考配置如下:
xml
<plugin>
    <groupId>org.apache.maven.plugins</groupId>
    <artifactId>maven-jar-plugin</artifactId>
    <version>2.6</version>
    <configuration>
        <archive>
            <manifest>
                <addClasspath>true</addClasspath>
                <classpathPrefix>lib</classpathPrefix>
                <mainClass>com.wallezhou.download.App</mainClass>
            </manifest>
        </archive>
    </configuration>
</plugin>

<plugin>
    <groupId>org.apache.maven.plugins</groupId>
    <artifactId>maven-dependency-plugin</artifactId>
    <version>3.1.1</version>
    <executions>
        <execution>
            <id>copy-dependencies</id>
            <phase>package</phase>
            <goals>
                <goal>copy-dependencies</goal>
            </goals>
            <configuration>
                <outputDirectory>
                    ${project.build.directory}/lib
                </outputDirectory>
                <excludeTransitive>false</excludeTransitive>
                <includeScope>compile</includeScope>
            </configuration>
        </execution>
        <execution>
            <id>copy-dependencies2</id>
            <phase>package</phase>
            <goals>
                <goal>copy-dependencies</goal>
            </goals>
            <configuration>
                <outputDirectory>
                    ${project.build.directory}/lib
                </outputDirectory>
                <excludeTransitive>true</excludeTransitive>
                <includeScope>system</includeScope>
            </configuration>
        </execution>
        <execution>
            <id>copy-dependencies3</id>
            <phase>package</phase>
            <goals>
                <goal>copy-dependencies</goal>
            </goals>
            <configuration>
                <outputDirectory>
                    ${project.build.directory}/lib
                </outputDirectory>
                <excludeTransitive>true</excludeTransitive>
                <includeScope>provided</includeScope>
            </configuration>
        </execution>
    </executions>
</plugin>

<plugin>
    <groupId>org.springframework.boot</groupId>
    <artifactId>spring-boot-maven-plugin</artifactId>
    <configuration>
        <executable>true</executable>
        <layout>ZIP</layout>
        <includes>
            <include>
                <groupId>nothing</groupId>
                <artifactId>nothing</artifactId>
            </include>
        </includes>
    </configuration>
</plugin>